Paper Jet 14

Paper Jet 14
Hull#001 Built by Dudley Dix

Sunday, October 23, 2011

Sail Track & Bow Sprit

Saturday morning started with a copious amount of sanding on the sail track area on both the top and bottom mast. I also spent some time making sure that the joining tube was flush with both sets of masts. This was followed by cutting the sail track to length and epoxying it onto the mast using zip ties to hold them in place. I took François advice and used a 45 degree scarf joint to join them together on the bottom mast. 


It actually turned out pretty good and I am pretty glad that I decided to go this route!

Sail Track Installed!

Joint between the top and bottom masts

I also took time to add the fiberglass wraps to both ends of the bowsprit. In order to get a nice straight line at the interface I added blue painters tape per the instructions. Once the fiberglass initially sets up I'll come back with a sharp knife and trim it up.


Blue tape assures a nice straight line at the fiberglass interface

While that was setting up I also decided to mix some extra laminating epoxy and drizzled it along the interface between the sail track and the mast to fill in some small voids. This is going to be a somewhat critical  connection and I want to make sure that there is a good solid interface between the two.

I drizzled in some laminating epoxy at the track/mast interface

After waiting a couple of hours I went back with an x-acto knife and cut the extra fiberglass off the bowsprit and peeled off the painters tape.

Bowsprit ready for sanding and finishing!


Next steps will be to sand everything and start applying epoxy!

Friday, October 21, 2011

Midweek Madness!

I decided to spend some quality time after work this week and put four coats of epoxy on the boom and also the rudder box and foil handles. I also coated the spigot of the bottom mast with epoxy in order to get it ready for the permanent attachment of the fiberglass sleeve.

Boom reading for final sanding and spar varnish!

Rudder Box sides and foil handles with 4 coats of epoxy!
Today after getting of work I went ahead and epoxied the rudder box together.


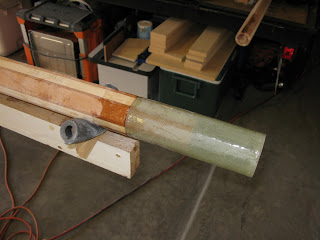
And after some sanding on both the sleeve and the spigot I epoxied the spigot onto the lower mast. My goal is to start attaching the sail track to the upper/lower mast this weekend and I wanted to get this out of the way.


I see a bunch of sanding in my near future as I get the bottom/top mast ready for the sail track and and epoxy.

Saturday, October 15, 2011

Miscellaneous Day!

So today I worked on a bunch of non related stuff!

Earlier this week I took the mast sleeve off the lower/top mast. Amazingly enough the whole thing came apart without any real theatrics (That is of course unless you consider playing tug-of-war with your wife using a mast as a rope as theatrics....). The only lesson learned out of the whole thing was not to use the blue painter's tape underneath a fiberglass layup and expect it to release afterwards! I had used it to keep the wax paper in place on the spigots and I ended up having to use my handy Cosco special generic dremel tool to sand it off the inside of the tube. It had become one with the fiberglass!

This morning I started out by sanding the mast sleeve to remove the high spots that built up at the ends and also to get rid of all the drips that ended up on the bottom. The first pass at rough sanding it with 100 grit paper looks pretty good. My next step with it will be to epoxy it in place on the lower mast and do some additional sanding once it has set up. I'm pretty confident that after an additional 3 coats of epoxy that I will put on the mast and sleeve that it will turn out pretty good. My goal at this point is not to paint it but leave it the crazy green color that it turned out. My wife thought it reminded her of the old greenish Coke bottles!


After I finished with that project my next step was to install the thumb cleats on the boom. Before I did that I went ahead and and gave the boom a thorough sanding using 150 grit followed by 220 grit sand paper. I figured it would be easier to do this without the thumb cleats in the way. I followed the sanding on the boom with sanding on the thumb cleats themselves. I hadn't really done anything with them after I cut them out and they needed to have all the corners rounded and also the bottom contoured to the shape of the boom. After I was finished with the sanding I epoxied them onto the boom. I also took the opportunity to use some of the epoxy I had mixed up to fill in a couple of gaps that I had on both the boom and the bowsprit where the birds mouth joint did not quite 100% join.


After that particular program was done I decided to finally drill the holes for the handles on both the rudder and the dagger board. A quick setup on the drill press and it was done in a jiffy! I also took the opportunity to cut the two 50mm long handles from the 32mm dowel I had purchased a while ago. I went ahead and sanded them/rounded off the corners so that they would be ready for a coat of epoxy. I'm going to go ahead and put a couple of coats of epoxy on the handle prior to gluing them in place. I am also still hesitant to give both of the foils the final sanding / varnishing since they are still being moved around a lot in the garage. I may still follow my original plan which is to do that at the end.

The hole cutter set up on the drill press.


Next thing I decided to work on was the rudder box. Interestingly enough the two panels that make the box were not included as part of the pre-cut pieces and therefore I had to make it myself. No worries since it was fairly easy. The good news was that I have kept all the scraps from the plywood and I was able to find two pieces that were big enough to work. After a little magic with a protractor and a table saw I got the two pieces along with the joiner piece cut out and ready for a coat of epoxy. I did not cut out the four outside spacer pieces since I am waiting on receiving the Pintle/Gudgeon combination from Mauri Pro Sailing and I want to make sure that the thickness is correct..


Next steps will be to sand the boom down one more time and apply 3 coats of epoxy to both it, the inside of the rudder box, and the spigot of the lower mast. I'm also going to work on installing the fiberglass reinforcing on the bowsprit

Its worth noting that other than the finish on the boat/spars that the majority of the construction effort on the boat is now over and I am down to the nitty gritty. Exciting stuff!!

Sunday, October 9, 2011

Mast Sleeve

After another couple of weeks of break I finally had a free Saturday to dedicate myself to this project! So a few things have happened over the past week. Firstly I ordered laminate sails and a spinnaker from iSails http://www.enUS.i-sails.com/oursailspaperjet.htm After a very important consult with my better half we decided to with the both the red trimmed sails and also the red spinnaker. I also ordered the majority of the boat hardware from Mauri Pro Sailing. Amazingly enough only one part was discontinued and I was able to find a replacement part from Ronstan. I was going to order the sheets/lines etc but decided to hang tight for a little bit until I think through some form of a color scheme.

Now back to the construction! First step was to figure out a good way to get both pieces perfectly straight and level while proving a means to still allow me to wrap the fiberglass around the spigots to make the sleeve. My solution was to use my work bench as the level surface and then to cut up some MDF slats to elevate both the mast and the top mast from the workbench surface. This assured that at least in the plane of the sail track everything was perfectly straight. This was followed by copious amounts of checking the alignments of both masts. I did this both using my 6' level, a laser level and also the old trusty naked eye approach by sighting down the mast!


Top Mast / Bottom Mast lined up
Once I was satisfied that everything was where it should be I started the process by making sure that both spigots aligned perfectly with each other and where the same shape/dimensions.

Spigots cleaned up and ready for taping
After some sanding to make sure the everything lined up perfectly and also one last double check with the level I wrapped a couple of layers of wax paper around the spigots along with some blue masking tape at the corners to make sure that things did not stick.

Ready for fiberglassing


Next step was to cut the fiberglass and wet it out. I had been trying to figure out the best way to do this without having the edges of the fiberglass unravel as I wetted things out. My solution was to wet it out on Seran Wrap which did the trick!


The bad news is that even though the wetting out process worked perfectly I still had issues with the edges of the fiberglass sheets unravelling once I started wrapping the fiberglass around the spigots. To be frank I have no idea of what I could have done differently to prevent this from happening. The interesting thing was that it took a total of 8 wraps of fiberglass to make up the 2mm thickness of the spigots! I was reading someone else's building blog and they mentioned that they used only two wraps. Not sure if that was a typo or not!


Once it set up I followed up with 3 coats of epoxy to fill in the weave.


Tomorrow I will see how this whole thing comes apart and see what challenges I will be presented with trying to do this! After I get it off the next step will be to do some sanding on the sleeve to take out the high points at both ends along with the numerous drips I encountered at the bottom of the sleeve!

Next steps will be to permanently attach the sleeve to the lower mast and to start the sail track installation. Once that is complete it will be time to start the final finish of the spars!