This weekend I concentrated on fiberglassing the dagger board while at the same time fiberglassing the top and bottom sections of the rudder.
The daggerboard was a little different from the rudder as I had glassed the top/bottom end ahead of time
I wetted out the fiberglass on the daggerboard while installing the fiberglass on the top end of the rudder.
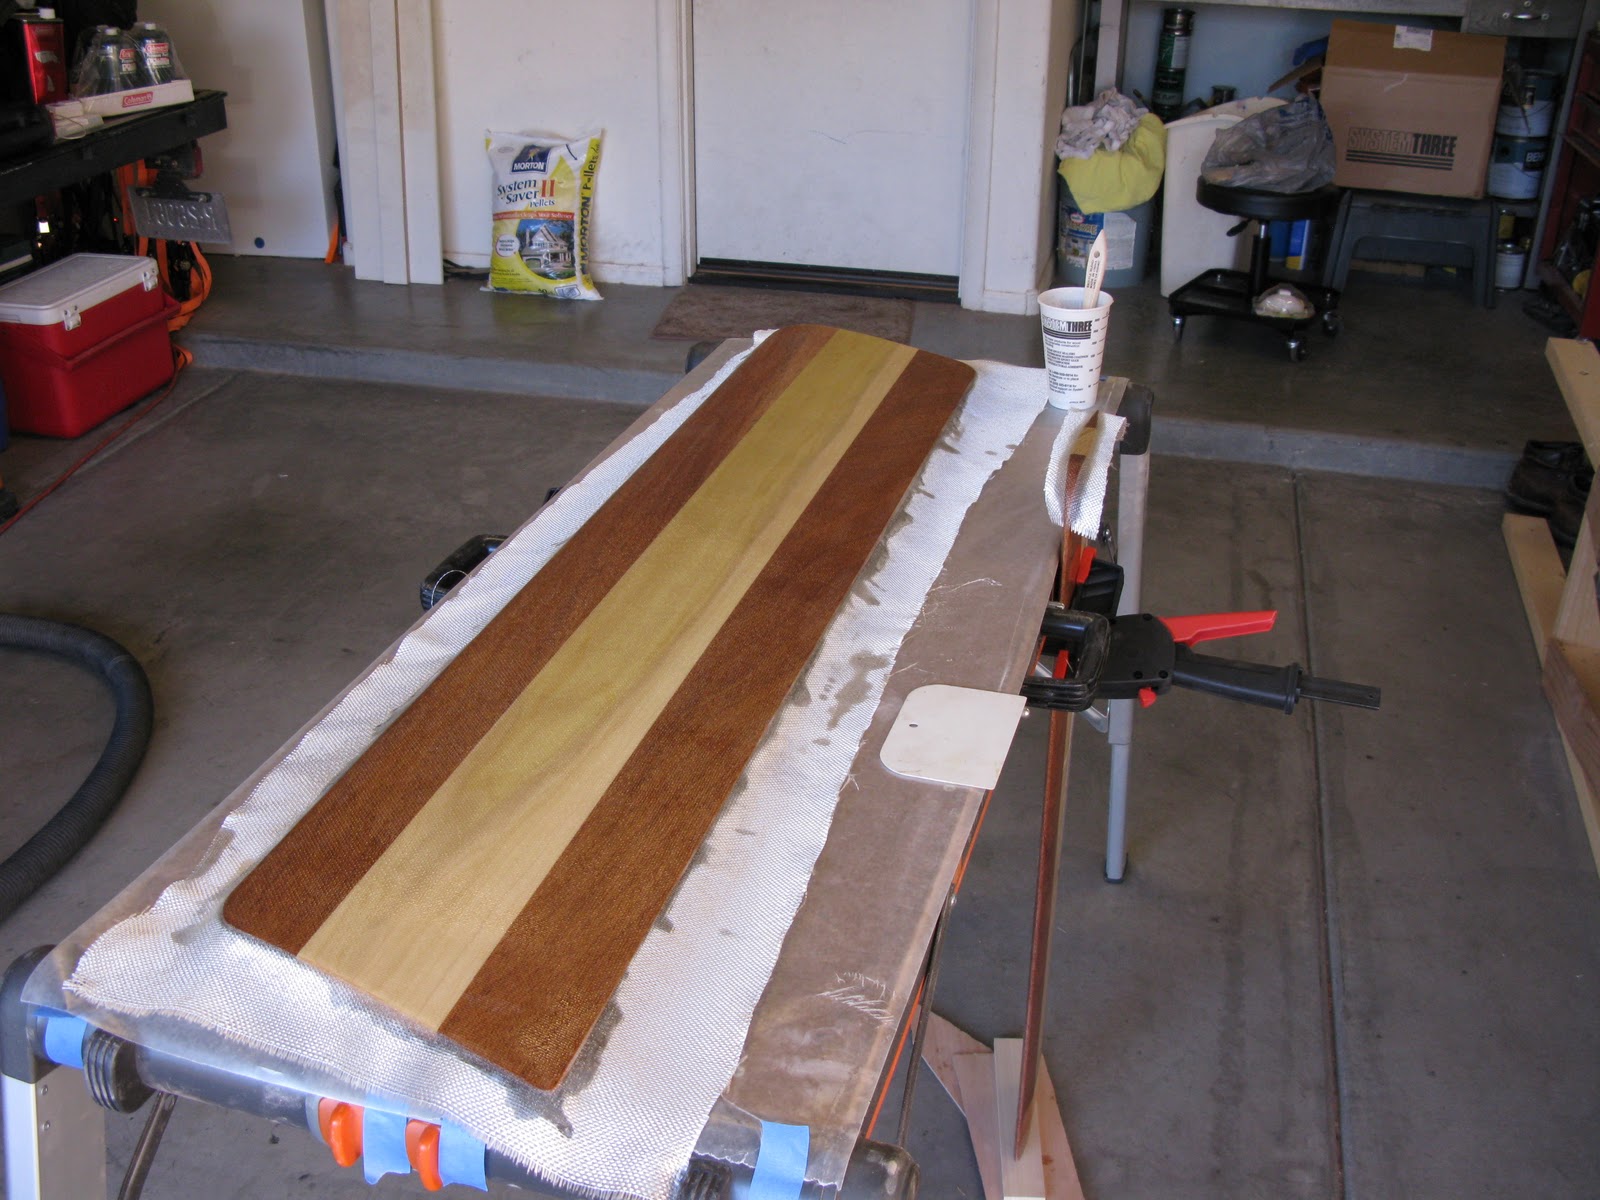
I let it cure overnight and came back and trimmed the excess fiberglass with a combination of scissors for the rough trim, a block plane to get it closer, and finally 220 grit sandpaper to getting it exact.
Interesting enough I have come to the conclusion that it really did not make much difference between fiberglassing the top/bottom first vs. the sides. The good news is that the way I did it, which was one of each, worked out pretty well from an efficiency standpoint. As you can tell by the picture same difference!
I flipped both the daggerboard and the rudder and did the other side. Picture below shows the dagger board fiberglassed and reading for the coat of epoxy that will fill in the weave.
Based on some challenges with that I faced with the rudder I added some blue masking tape to the leading/trailing edge of the foil in order to mitigate any potential runs. Next steps is to fill the fiberglass weave on the the dagger board and get a decent coat of epoxy so I can get it ready for sanding and a coat of spar varnish. I also have to drill the holes and epoxy in handles to both foils.
My understanding is that it is a good idea to wait a couple of weeks prior to applying the varnish in order to make sure the epoxy is fully cured.
Next steps is to build the rudder hold down assembly and the tiller
Sunday, January 30, 2011
Monday, January 24, 2011
Starting The New Year with Foils!
Well so much for back in action after 6 weeks! I guess I was a little overly optimistic with regards to the recovery time involved with ACL replacement surgery. I can't say that it was fun (or still is for that matter) but what I can say is that I am happy to be back working on the boat!
My game plan is to take the foils (rudder & daggerboard) to completion prior to bringing the hull down from the roof of the garage. My thoughts are twofold on the subject: Firstly, both foils have been in various stages of completion for quite some time and it would be nice just to finish them and have something completed on the boat; Secondly, it will give me knee a little additional time prior to putting the strain on my knee of walking the boat down the step ladder!
First step was to grab both foils and do some touch up sanding with 100 grit to get their profiles as symmetrical as possible and then follow up with the 220 grit fine sanding.
Next step was to start the fiberglass process. This is something I have been mulling over for some time. I looked at a couple of different builders websites to see what they did and how it compared to Dudley's instruction. My biggest concern arises out of the fiberglassing issues I had when laying the tape on the forward transom of the boat. The main lesson I walked away from that particular fiasco was that fiberglass as a whole does not like to make sharp angles and will not lay down properly. Therefore the trick was to figure out how lay the fiberglass on both sides of the foils and on the top and bottom. The instructions have you taping the fiberglass sheet to the underside of the foil while stretching it good and tight, although I noticed that on the web site of a couple of other builders did not follow them. I also read on another web site to do the tops separately from the sides which is the course I ultimately decided to take (Although I did attempt the taping technique when I was fiberglassing the flip side of the rudder which I ultimately had to undo since I ran into my dreaded air pockets!).
I decided to start on the rudder. I cut a sheet of fiberglass to size and proceeded to wet it down using a squeegee and brush. I let it set up overnight trimmed it, sanded the edges then repeated the process on the other side. Tonight when I got home from work I trimmed that side up flipped it back to the side I worked on first and gave it a good second coat of epoxy to fill in the weave of the fiberglass.
It's amazing how the fiberglass disappears once you fill in the weave. As you can tell, I also decided to start fiberglassing the top of the daggerboard at the same time. On the rudder I will do this step last. I guess between the two foils I will figure out which is the best order to do it in!
Tomorrow I will flip the rudder and put the second coat on the flip side, while trimming the fiberglass on top of the daggerboard, and fiberglassing the bottom.
My game plan is to take the foils (rudder & daggerboard) to completion prior to bringing the hull down from the roof of the garage. My thoughts are twofold on the subject: Firstly, both foils have been in various stages of completion for quite some time and it would be nice just to finish them and have something completed on the boat; Secondly, it will give me knee a little additional time prior to putting the strain on my knee of walking the boat down the step ladder!
First step was to grab both foils and do some touch up sanding with 100 grit to get their profiles as symmetrical as possible and then follow up with the 220 grit fine sanding.
Next step was to start the fiberglass process. This is something I have been mulling over for some time. I looked at a couple of different builders websites to see what they did and how it compared to Dudley's instruction. My biggest concern arises out of the fiberglassing issues I had when laying the tape on the forward transom of the boat. The main lesson I walked away from that particular fiasco was that fiberglass as a whole does not like to make sharp angles and will not lay down properly. Therefore the trick was to figure out how lay the fiberglass on both sides of the foils and on the top and bottom. The instructions have you taping the fiberglass sheet to the underside of the foil while stretching it good and tight, although I noticed that on the web site of a couple of other builders did not follow them. I also read on another web site to do the tops separately from the sides which is the course I ultimately decided to take (Although I did attempt the taping technique when I was fiberglassing the flip side of the rudder which I ultimately had to undo since I ran into my dreaded air pockets!).
| Wetting down the Fiberglass on the Rudder |
I decided to start on the rudder. I cut a sheet of fiberglass to size and proceeded to wet it down using a squeegee and brush. I let it set up overnight trimmed it, sanded the edges then repeated the process on the other side. Tonight when I got home from work I trimmed that side up flipped it back to the side I worked on first and gave it a good second coat of epoxy to fill in the weave of the fiberglass.
It's amazing how the fiberglass disappears once you fill in the weave. As you can tell, I also decided to start fiberglassing the top of the daggerboard at the same time. On the rudder I will do this step last. I guess between the two foils I will figure out which is the best order to do it in!
Tomorrow I will flip the rudder and put the second coat on the flip side, while trimming the fiberglass on top of the daggerboard, and fiberglassing the bottom.
Sunday, November 14, 2010
Wing Caps Part III
Undid the straps and used my handy backsaw to trim the leading edges of the capping. I followed that up with the sanding block and 80 grit sandpaper. Looks good! I will come back later with finer sand paper on both the leading edge of the wing and caps prior to applying the laminating epoxy.
Boat is now back up on the roof and Cathy's car is back in the Garage.
Hopefully I will be working on it again in the next 6 weeks or so! Tomorrow I get my knee worked on - Hopefully all goes well!
Boat is now back up on the roof and Cathy's car is back in the Garage.
Hopefully I will be working on it again in the next 6 weeks or so! Tomorrow I get my knee worked on - Hopefully all goes well!
Thursday, November 11, 2010
Wing Caps Reloaded!
This evening when I got home I sanded the aft end of the caps that I epoxied yesterday nice and flush and epoxied on the wing caps.
Cathy was nice enough to lend a hand while I got the clamps installed, lined up etc.
I'm thinking this is going to be it for the next 4 - 6 weeks. I'm having knee surgery this Monday which will pretty much stop this project for a while.
I'm slightly bummed, but on the other hand Cathy get's her parking spot back!
Cathy was nice enough to lend a hand while I got the clamps installed, lined up etc.
I'm thinking this is going to be it for the next 4 - 6 weeks. I'm having knee surgery this Monday which will pretty much stop this project for a while.
I'm slightly bummed, but on the other hand Cathy get's her parking spot back!
Wednesday, November 10, 2010
Wing Caps
Tonight I started working on the wing caps. I made the cuts, and glued the back end pieces on first.
Tomorrow I will sand them flush and install the balance of the cap. I have tentatively placed the straps on the boat to hold the caps in place as they dry. I though I had some cabinet clamps that where long enough, but they ended up being about 2 feet to short!
I'm pretty certain that I'll need my wife's help on this tomorrow!
Tomorrow I will sand them flush and install the balance of the cap. I have tentatively placed the straps on the boat to hold the caps in place as they dry. I though I had some cabinet clamps that where long enough, but they ended up being about 2 feet to short!
I'm pretty certain that I'll need my wife's help on this tomorrow!
Monday, November 8, 2010
More Wings!
I added the fillet between the wing and the hull and fiberglassed the seam. I spent some time getting the fillets to be nice and uniform since the filleting material is tough to sand. The top rounded edge of the plastic squeegee worked out perfectly for this!
| Filleted and ready for fiberglass |
I went ahead and and taped the seam up for some extra strength in this area (Plus I had some extra 2" fiberglass tape left over!
| Taped up! |
Daggerboard Revisited
I finally got the daggerboard back out and started attacking the trailing edge. Pretty much the same program as the rudders but double the size and double the effort!
I finally figured out that I was better off using the hand plane to get it as close as possible versus getting it in the ballpark and finishing it up with the belt sander. I also have started to be a lot more confident with the belt sander and not being afraid to use it and sand off too much. Of course you always learn these lessons at the end of the project. Would have been handy to know up front! I guess it will come in handy when shaping the rudders / keel on the next boat.
I took a picture of the rudder and daggerboard together for a perspective!
Next step will be to do some fine sanding and fiberglass these up. I'll get to that later on!
I finally figured out that I was better off using the hand plane to get it as close as possible versus getting it in the ballpark and finishing it up with the belt sander. I also have started to be a lot more confident with the belt sander and not being afraid to use it and sand off too much. Of course you always learn these lessons at the end of the project. Would have been handy to know up front! I guess it will come in handy when shaping the rudders / keel on the next boat.
I took a picture of the rudder and daggerboard together for a perspective!
Next step will be to do some fine sanding and fiberglass these up. I'll get to that later on!
Subscribe to:
Posts (Atom)