Paper Jet 14

Paper Jet 14
Hull#001 Built by Dudley Dix

Sunday, November 20, 2011

Rudder Box / Tiller

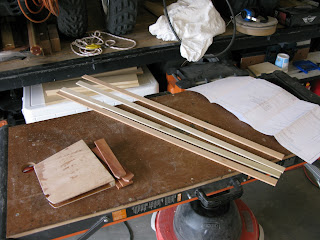
Now that I finally the gudgeons, I now have the final piece of the puzzle to finish off the rudder box: The width of the gudgeon support strips! I had some mahogany laying around the place that was close to the right size and not too far off the correct thickness. So after some quality time with the table saw and the thickness planer I was able to create these pieces.


I also took the time to build up the tiller. I decided to laminate a combination of cedar and poplar strips to keep in character with the rest of the boat. Somehow a laminated tiller is a lot prettier than just a solid cedar one.


I went though my spare stack of cutoff wood pieces and found a couple of appropriate cedar and poplar pieces. These too I ran through the table saw / thickness planer to get them to the right size. I left a little extra width on the pieces to allow me to clean things up on the thickness planer once everything was set up.


I epoxied both pieces together and let everything set up overnight. I then proceeded to finalize the tiller handles. After cleaning the edges up on the joiner to get rid of the extra epoxy I shaped the ends to match the rudder box and then ran it through an 1/8 round router bit on the router table to soften the edges.


Once complete I epoxied the whole mess together and voila! A finished piece! Amazingly enough this is really that last piece of construction that was left on the boat!


Once everything has set up it will be time to sand, epoxy and varnish!

My next project is to finish the top mast!

Friday, November 18, 2011

Sailboat Hardware

Received the sailboat hardware from Mauri Pro Sailing. It's amazing that all these pieces cost well over $800!


As far as I can tell building the hull/spars accounts for slightly over 1/3 of the total cost of the finished boat. The other 2/3rds are split 50/50 between paint, hardware, rigging and the sails.

In so far as build progress I have added 3 coats of laminating epoxy to the lower mast. The plan for this weekend is to finish sanding the top mast and also to finish the construction of the rudder box / tiller assembly now that I have the gudgeons.


Sunday, November 6, 2011

Finishing the Lower Mast

Spent some quality time this afternoon working on the finish sanding of the lower mast and getting it ready for epoxy. I went ahead and ordered a few Tyvex suits for the upcoming painting of the hull and decided to wear one while sanding to prevent being covered in a mixture of wood and epoxy dust. The picture kind of reminds me of the old Intel commercial! All that was missing was a little "Play that funky music white boy!"


While I was sanding the mast I paid special attention to sanding the sail track to prevent any small burrs caused by the saw from catching on the sail. I also wanted a smooth surface where I could add epoxy over.

Ready for epoxy!


What is not shown is that I let it sit for a couple of hours to let all the dust settle in the garage and managed to put a coat of epoxy on it. My goal is to put two more coats between today and Wednesday.


Saturday, November 5, 2011

Holy Mast Batman!

It occurred to me that I should do a quick test fit of the mast on the boat before I got too carried away doing the final sanding and finishing on the mast. So, today my wife and I took the hull down from the ceiling and parked it in our driveway. After some sanding on both the mast and the mast holder everything went in and looked good! The picture does not do justice the fact that the mast is towering over the hull and it does not even include the additional five feet of top mast!


As part of the fitting process I checked that the mast was square both fore and aft and port/starboard. Amazingly enough everything was perfect!

I now have the mast set up on the saw horses to start the final sanding process

Wednesday, November 2, 2011

Sails have arrived!

My sails arrived today at work from iSails. Wow what a big package!


They look really nice!


I also managed to put 3 coats of epoxy on the bowsprit


Next steps finish up the mast!